Archive | Gardening RSS feed for this section

Storing Tomatoes in Newspaper

At the end of the gardening season last year I had many green tomatoes. I wrapped them in pieces of newspaper and stored them in a brown paper bag in my basement. I kept them in the dark and they not only ripened over the winter but stored very well.

Here are a few of the last tomatoes that I just unwrapped today. They have been stored in the newspaper for 4 months. As you can see they look pretty good. Some of the skins are a bit wrinkled but these tomatoes tasted great in my green salad today.

Storing Details:
Wrap only about 2 green tomatoes in each piece of newspaper loosely. Place each wrapped newspaper bundle in a brown paper bag. I was able to put quite a few bundles of wrapped tomatoes in the paper bag. Close the bag and keep it in the dark. Storing in the basement worked well for me.

Check the tomatoes in a few weeks or as needed. Remove the red ripened tomatoes. Re-wrap the green tomatoes and put them back into the brown paper bag until ripe or when you need a tomato.

Conclusion:
Green tomatoes can be saved, stored, and ripened over the winter for future use.

2

Storing Green Tomatoes

I had many green tomatoes left over after the gardening season. I just hated not saving them for future use. I had read that you can store green tomatoes for future use by wrapping them individually in newspaper. So I gathered all my green tomatoes in October and wrapped them separately in pieces of newspaper. I then put them loosely in a brown paper bag and put them in my basement larder.

Today I carefully unwrapped a few of the newspapers to check on the tomatoes. I needed a few tomatoes for a green salad I wanted to make. I was pleasantly surprised that many of the tomatoes were bright red and ripe. A few were still green or orange so I just re-wrapped them and put them back in the bag to use later.

So if you have green tomatoes, you might want to try out this useful idea for storing and ripening your tomatoes. Using this method will provide you ripe tasty tomatoes well into the winter months.

0

Ripening Green Tomatoes

If you have green tomatoes left over in your garden, here is a great tip on how to ripen them and turn them red. Pick the green tomatoes and place them inside a paper bag along with a ripe banana. Apparently the ripe banana gives off a gas that helps ripen the green tomatoes naturally.

Here is a photo of a few tomatoes that I placed inside the bag that were very green. After just 5 days with the ripe banana they have ripened up nicely.

Instructions:
Place green tomatoes for ripening inside a paper bag. I used a small lunch sack and then added a ripe banana. Close the bag and check it in a few days. If the tomatoes aren’t ripe yet, close the bag and check it again in a few more days. Tomatoes should be fully ripened within 7 days.

0

Growing Celery Indoors Update

Here is my indoor celery growing experiment after 20 days. I originally posted about how to start a celery stalk to grow celery indoors in this post.

I just wanted to share my celery’s progress after 20 days. As you can see there are more leaves and little stalks are beginning to grow from the base of the celery start.

I am excited about the growth of my celery start and hope the plant continues to thrive. I will post more progress in the future.

0

Growing Indoor Celery

I love celery and always wondered about growing my own when I spotted this great idea about growing your own celery from a stalk end. So here is what I call my useful idea that you can eat.

First you just need the end of the stalk that you usually discard after cutting the celery stalks off which leaves the end base of the celery plant. You place the end in a can or dish with a few inches of water. Here is my can with the celery start in it. This photo was taken after one week in the water. As you can see the center has new growth and little green leaf starts are emerging.

For the full details on the experiment that 17 Apart did you can read their blog post here.

I just transplanted it into dirt at day 10. Re-plant the celery start in a pot of dirt. Cover up to the new leaf growth and water well. Here is the latest progress of my indoor celery start after re-potting the celery start today.

I will post more pictures of my celery growing experiment as my plant begins to grow. So check back in for an update on my celery growing in the coming weeks and months.

1

Cayenne Pepper Keeps Pests Away

I read that cayenne pepper can be helpful at keeping pests away. Apparently mice, squirrels and other pests don’t like the smell of cayenne pepper. I have been having a problem with mice getting in my greenhouse and eating my tender seedling plants so I wanted to give this idea a try.

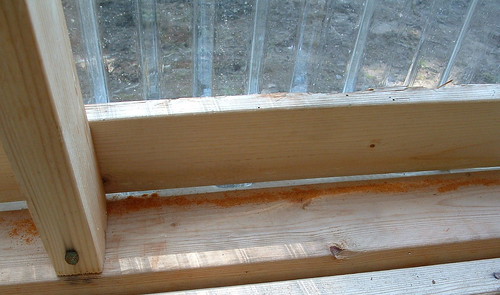
I have also read that ants and some other bugs don’t like cayenne pepper either so this may be a good solution to deter them too. I bought a 50 cent bottle of cayenne pepper and have sprinkled it generously all around the greenhouse as shown above. So far it appears to be working. My seedlings haven’t been getting eaten overnight like they had been but lets give it some time to see if this really works.

It’s been about a week now since I first spread some cayenne pepper around in my greenhouse. The plants have been left alone and it doesn’t appear that anything has been getting in and eating them. So if you have been having problems with mice or other such pests, you might try this useful idea of applying cayenne pepper around the area to repel them.

Application: Sprinkle the cayenne pepper all around areas where you want to keep the pests away. Especially apply cayenne pepper in holes and openings where the pests are entering. Re-apply every few weeks to keep the strong smell present for the best results.