Archive | Food & Drink RSS feed for this section

Homemade Apple Pie Moonshine

Here is my recipe for homemade apple pie moonshine. I researched the process and checked out a few different recipes and home brews to come up with this small batch recipe.

Homemade Apple Pie Moonshine

Apple Pie Moonshine Recipe

1 qt apple juice (32 oz)
1 qt apple cider (32 oz)
3/4 cup of brown sugar
1/4 cup of white sugar
3 cinnamon sticks
1 fifth of cheap 100 proof vodka
3 qt jars and lids

In a large pot, combine juices, sugars, and cinnamon sticks. Bring to a boil as you stir occasionally. Once at a boil, remove from heat and allow to cool to room temperature. Once cooled, add vodka and stir well.

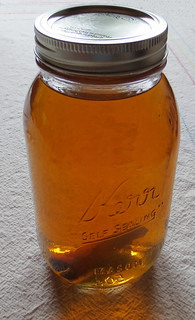
Pour into sterilized Mason jars with one cinnamon stick in each jar. Store in a cool, dry and dark place for at least a month.

Makes 3 quarts.

Conclusion:
After 3 weeks in dark cool storage, I had to test my moonshine. I served it over ice, and it was delicious. It has a good mixture of spicy, sweet apple flavor with a refreshing taste. Overall I’m thrilled with my very tasty homemade moonshine.
Storing Tomatoes in Newspaper

At the end of the gardening season last year I had many green tomatoes. I wrapped them in pieces of newspaper and stored them in a brown paper bag in my basement. I kept them in the dark and they not only ripened over the winter but stored very well.

Here are a few of the last tomatoes that I just unwrapped today. They have been stored in the newspaper for 4 months. As you can see they look pretty good. Some of the skins are a bit wrinkled but these tomatoes tasted great in my green salad today.

Storing Details:
Wrap only about 2 green tomatoes in each piece of newspaper loosely. Place each wrapped newspaper bundle in a brown paper bag. I was able to put quite a few bundles of wrapped tomatoes in the paper bag. Close the bag and keep it in the dark. Storing in the basement worked well for me.

Check the tomatoes in a few weeks or as needed. Remove the red ripened tomatoes. Re-wrap the green tomatoes and put them back into the brown paper bag until ripe or when you need a tomato.

Conclusion:
Green tomatoes can be saved, stored, and ripened over the winter for future use.

2

Storing Green Tomatoes

I had many green tomatoes left over after the gardening season. I just hated not saving them for future use. I had read that you can store green tomatoes for future use by wrapping them individually in newspaper. So I gathered all my green tomatoes in October and wrapped them separately in pieces of newspaper. I then put them loosely in a brown paper bag and put them in my basement larder.

Today I carefully unwrapped a few of the newspapers to check on the tomatoes. I needed a few tomatoes for a green salad I wanted to make. I was pleasantly surprised that many of the tomatoes were bright red and ripe. A few were still green or orange so I just re-wrapped them and put them back in the bag to use later.

So if you have green tomatoes, you might want to try out this useful idea for storing and ripening your tomatoes. Using this method will provide you ripe tasty tomatoes well into the winter months.

0

Heel Roast in a Dutch Oven

A heel roast isn’t the most tender cut of beef but it is very flavorful. Roasting a heel roast in a Dutch Oven is a wonderful way to slow cook the beef and results in a wonderful tender meal. Add carrots and potatoes and you have a complete one pot tasty meal. Here are the details on how I prepared and cooked my beef roast.

Ingredients:
3-4 pound Beef Roast (Heel Roast used in this recipe)
Olive Oil
Spices (garlic, salt, pepper, seasoning salt, sage)
Small onion diced
1 can beef broth
Carrots and potatoes (if desired)

Directions:
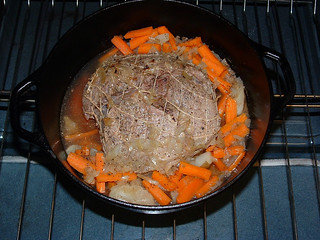
Rub olive oil over roast. Sprinkle roast with desired spices. I used garlic, salt, pepper, seasoning salt, and sage. Rub the spices into the meat and place meat on cast iron trivet inside the Dutch Oven. Pour a small amount of beef broth over the meat and put it in a preheated oven at 425 degrees F for 15 minutes to sear the meat with the lid off.

Add cut up carrots and potatoes around the meat. Top the veggies and the meat with diced onion. Pour the rest of the can of beef broth over the meat. Put the lid on the Dutch Oven and reduce oven heat to 325 degrees. Bake for 3 hours or until desired doneness. I did check the roast once at the 2-1/2 hour mark to baste it and I took the picture above. My meat wasn’t quite done so I left it for about another 20-30 minutes and then removed it from the oven. I let it set for about 15 minutes before serving.

I used the juice reserves from the pot to make gravy to top off my meal.

The results — A great meal of tender roast beef and tasty vegetables!

1

Ripening Green Tomatoes

If you have green tomatoes left over in your garden, here is a great tip on how to ripen them and turn them red. Pick the green tomatoes and place them inside a paper bag along with a ripe banana. Apparently the ripe banana gives off a gas that helps ripen the green tomatoes naturally.

Here is a photo of a few tomatoes that I placed inside the bag that were very green. After just 5 days with the ripe banana they have ripened up nicely.

Instructions:
Place green tomatoes for ripening inside a paper bag. I used a small lunch sack and then added a ripe banana. Close the bag and check it in a few days. If the tomatoes aren’t ripe yet, close the bag and check it again in a few more days. Tomatoes should be fully ripened within 7 days.

0

Baking Potatoes in a Woodstove

I want to share my experience of using a woodstove to bake potatoes. We use a woodstove to heat our home and I wondered about using the woodstove for baking potatoes. It’s already hot and has room inside for baking so why start up the oven for baking potatoes when I could use the woodstove. So I set out to try out my idea, first you want a hot woodstove that has burned down a bit and has hot ashes that you can use as a bed for baking the potatoes.

Next double wrap the potatoes in foil. Move the fire over to one side of the stove as you want to place the potatoes in hot coals and ash but not directly against any burning wood.

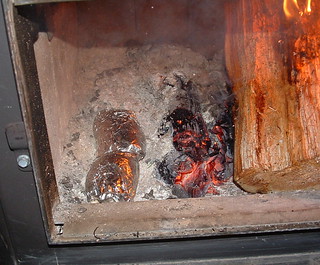
Here is a photo showing my two potatoes wrapped in foil and placed inside the woodstove. As you can see, the potatoes are on the ash bed with the burning wood moved over to the side.

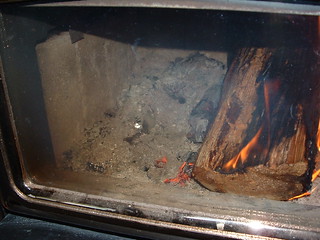
After placing the potatoes inside the woodstove, cover up the potatoes with some hot ashes on the side of the firebox as shown in the picture below. I use my small stove shovel to scoop some ashes cover the potatoes to help them bake evenly.

In about 20 minutes, turn potatoes over and cover again with ashes. My large bakers were done after about 45 minutes in the woodstove. Using a potholder, squeeze the taters to make sure they are done and then remove them carefully using a thick potholder or heavy leather gloves as the potatoes are very hot.

The results are some wonderful baked potatoes that are very tasty. This useful idea produces great tasting baked potatoes but also is very useful should you have a power outage. Plus it saves energy by reducing the use of a traditional oven for baking.

6